
Tower Lab Tower Roster
All 20 named cubes grouped by job: knock, control mass, or grow the factory.
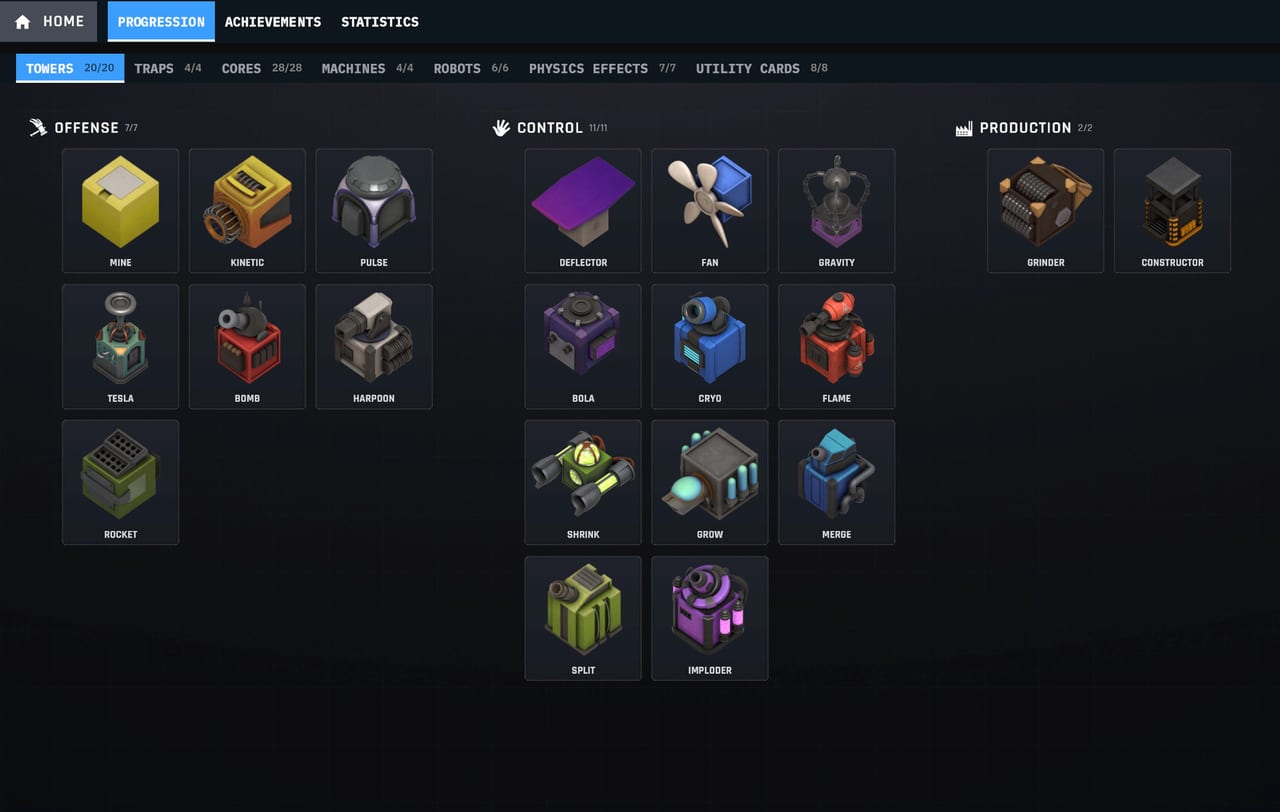
This roster is the confirmed Early Access set of 20 towers. Steam Early Access is scheduled for September 7, 2026. The public demo collection already listed Towers 20/20. Names below are the only cube names this wiki uses. There is no health bar and no DPS column. Each entry is a physics job: push, pull, redirect, change mass, apply a status, or produce resources.
Play cubes from your hand by spending Energy, then place them in any open space. You can move them. After the wave, spend Matter in the shop and Tech Points on the cube’s tree. For the rules of a turn, read how to play. For mass, friction, and materials, read physics basics. Combos live on tower synergies. Module rules live on upgrades and tech trees. Rankings live on the tower tier list.
How to read this roster
Offense cubes apply the shove. Control cubes change the path, the mass, or the timing of that shove. Production cubes turn robots into Scrap or grow the lab so later waves have more tools. A first hand should cover at least two of those jobs. A Tesla with no partner is a zap. A Tesla aimed at copper, with Shrink on the cluster and a Fan toward an edge, is a machine.
Materials matter. Tesla prioritizes conductive bodies such as copper and deprioritizes rubber. Rubber also fights knockback and adds bounce. Temperature, friction, magnetism, and conductivity are properties, not damage types. If a cube “counters” a robot, it is because the physics disagrees, not because a hidden multiplier fired.
Offense cubes
Mine drops knock mines onto the lab. Robots trigger them. Treat Mine as chaos you can aim: a Deflector can bounce mines into a corridor, and bouncy-mine modules turn the floor into a pinball table. Mine is not a turret. It is a payload you place, redirect, and sometimes Grow.
Kinetic is the momentum cube from the official Kinetic short. It fires energy orbs that knock robots back. The projectile is not pulled by gravity the way a lobbed bomb is, which is why Kinetic plus Deflector can build an energy barricade robots have to brute-force, and why two Kinetic cubes plus a Fan can act like a shotgun trap. If you need a reliable shove that still plays with bounce, start here.
Pulse emits timed knockback pulses rather than a stream of shots. Gravity’s official video shows a yellow pulse payload being captured in orbit; that is the point of Pulse as a partner. Park Pulse near a well so every beat shoves the cluster, or aim the pulses at a ledge. Pulse is a metronome, not a sniper.
Tesla zaps enemy robots with high knockback and prioritizes conductive materials. Rubber is targeted last and resists the shove. Official upgrades include Double Strike, which adds extra targets, and a chain-to-nearby module. Both stack, so multiple copies of the same module add more arcs and more jumps. Tesla is strong enough that playtest notes removed it from the Region 1 starting deck. Bring it when copper is on the board and you have Tech Points ready.
Bomb launches explosive projectiles for area knockback. Grow the projectile before it detonates and the blast moves more mass. Bounce it with Deflector so one barrel covers two lanes. Bomb is the loud cousin of Pulse: wider, messier, and happier when you scale the payload instead of the cube.
Harpoon is a yank. It grabs a robot and pulls that mass off the painted path toward the cube or toward an edge. Use it on heavy bodies that ignore a light Fan, or to steal a robot out of a Gravity well before the well overfills. Harpoon is line work. Place it with a clear shot at the lane you actually want to empty.
Rocket fires ballistic rockets that detonate for area knockback. Unlike Kinetic, these payloads care about flight path. Grow them, bounce them, or let Gravity capture them into a moving barrage. Rocket is a travel-time cube. If the lane is short, Mine or Bomb may land first. If you have space to loft a payload over a wall, Rocket is the loft.
Control cubes
Deflector redirects projectiles and paths. After the rework, bombs, mines, and even units can bounce off it. Chain several Deflectors into a conveyor for mines, or into a loop that sends a grown Bomb around the lab until it detonates. Playtesters once parked Deflector at the bottom of informal lists. After anything could bounce, it became the plumbing of most machines.
Fan throws directional gusts that push or slow objects. Aim it at an edge to finish a knockoff, or against a lane to stall a heavy robot. Fan plus Gravity is the poster combo: the well holds mass in orbit, the wind turns that orbit into a spiral that sweeps the lab. Fan is also the cheapest way to turn Shrink into a win, because a light body in a gust leaves the map.
Gravity pulls nearby objects into orbit. It works on enemies and on projectiles. You can yank a robot off its path and hold it while other cubes shove, or you can drop the whole orbit off a ledge. You can also capture a Pulse, a Bomb, or a Rocket and turn the well into a moving turret. Gravity is the reason this roster page embeds the official Gravity tower video.
Bola snares. It wraps mass so a robot cannot walk the path at full stride. Bola does not win waves by itself. It buys time for Fan, Harpoon, or Tesla to finish the job, and it can bind two light bodies into one awkward clump that a Deflector can redirect.
Cryo chills. Cold robots fight knockback less effectively because they are no longer sprinting through your gust. Pair Cryo with Fan or Pulse. Black Ice as a utility card is the same temperature idea in card form: make the floor disagree with the walker.
Flame is the heat counterpart. Temperature is a physics property in Tower Lab, so Flame is a status cube that changes how mass slides, bounces, or accepts other effects. It wants a knockoff partner. Do not treat Flame as a damage-over-time turret. There is no damage-over-time, because there is no health.
Shrink makes robots easier to knock off. Smaller mass, smaller problem. Shrink then Fan is the cleanest early combo in the game. Shrink also plays with Split: a halved body that you then Shrink is almost a free shove. Use Shrink when the wave is about to leak, not as a trophy upgrade on an empty lane.
Grow is the risk lever. Grown robots drop more Matter and are harder to knock. Grown projectiles hit with more force. Official copy is explicit: shrink robots to make them easier to push, or risk growing them for increased rewards, and grow projectiles to make them more powerful. Grow is how matter farming stays interesting, and how Bomb, Rocket, and Mine stop being polite.
Merge fuses nearby objects into a heavier body. Use it on Scrap, on grown projectiles, or on two light robots you would rather treat as one. Merging enemy mass is a gamble: you may create a body that ignores your Fan. Merge is a specialist. It shines in factory lines next to Split and Grow, not as a first-region crutch.
Split cuts an object in front of it, halves the mass, and creates a copy. It began as a clone experiment; cloning clones broke the lab, so Split now demands a setup. Split, add mass with Grow, Split again, and you have a projectile engine. Bounce the results with Deflector. Split is control that pretends to be production.
Imploder collapses mass inward. Think of it as Bomb’s inward cousin: a local vacuum that gathers a cluster, then dumps that cluster as one shove. Place it where robots already bunch, or where Gravity has done the bunching for you. Imploder is picky about placement and quiet when the lane is a thin file.
Production cubes
Grinder grinds enemies into Scrap. Build a Conveyor Line off its output to carry that Scrap where you want it: into a Grow, into a Merge, into a ledge, or into another machine. Grinder is why Tower Lab feels like a factory sim wearing a tower-defense coat. If you place Grinder with no output plan, you have a noisy bin.
Constructor is the other production cube. Treat it as the factory that grows the lab during a run rather than as a knockback turret. It exists so your line can add pieces instead of only adding shoves. Pair Constructor with Grinder so Scrap has somewhere to become more lab. Production without a knockoff edge is a museum.
Picking a first hand
A practical first six is Fan, Shrink, one offense cube (Kinetic or Bomb), Gravity if the map has a pit, Grinder if you want a Scrap plan, and Deflector if you already have a projectile. Leave Tesla for later regions unless copper is everywhere and you have T to spend. Playtest notes removed Tesla, Salvage, and Hot Swap from the Region 1 starting deck for a reason.
If the shop offers a second copy of a cube you already chain, take the copy before you take a lonely new name. Two Fans on one Gravity well beat a Fan, a Bola, and a Flame that do not share a job. For sample openings, use starter decks. For a shop filter, use the tower tier list, then ignore the letter if the cube does not plug into your current machine.
This roster is a parts list. The win is the machine you build from it. After you know the twenty names, spend a run on tower synergies and one run on upgrades and tech trees so the parts actually talk.
Frequently Asked Questions
Quick answers for new Tower Lab players.
What are the 20 Tower Lab towers?
Offense: Mine, Kinetic, Pulse, Tesla, Bomb, Harpoon, Rocket. Control: Deflector, Fan, Gravity, Bola, Cryo, Flame, Shrink, Grow, Merge, Split, Imploder. Production: Grinder, Constructor. Details are grouped above on this tower roster.
Which towers should I play first?
Fan, Shrink, and one offense cube such as Kinetic or Bomb. Add Gravity when the map has a pit. Tesla is strong later; it is no longer a Region 1 starter. See starter decks.
Does Gravity work on projectiles?
Yes. Gravity orbits enemies and projectiles. That is the core of the Fan plus Gravity spiral on the synergies page.
What does Grinder produce?
Scrap. Build a Conveyor Line off the Grinder output so Scrap can move into Grow, Merge, or an edge. Economy notes sit in matter farming.
Why is Tesla missing from some early decks?
Playtest notes removed Tesla, Salvage, and Hot Swap from the Region 1 starting deck. Tesla still has stackable Double Strike and chain modules on the upgrades page.
Is this roster final after Early Access?
It is the launch target of 20 towers. The full version plan includes a larger roster later. Track dates on the roadmap.