
Tower Lab Cores and Machines
Run-defining loadouts, campaign taxes, traps, and utility. Names stay unpublished unless confirmed.
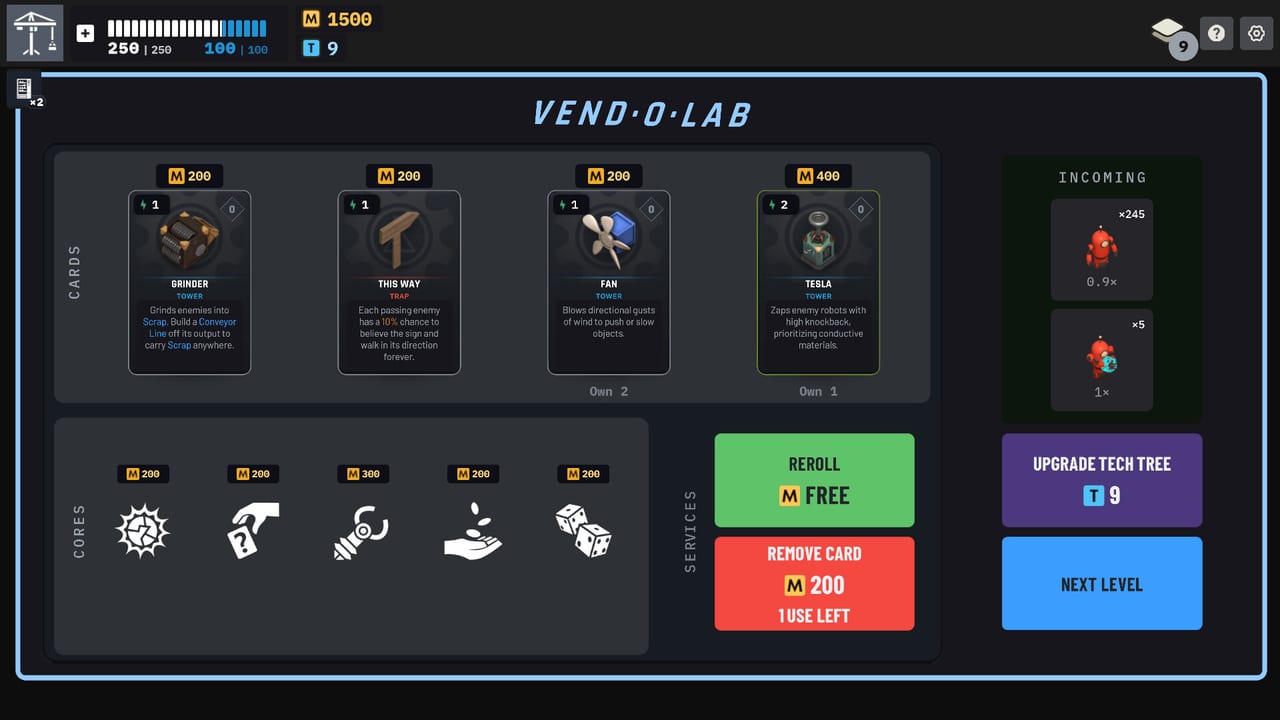
Cubes are the verbs. Cores and machines are the run. Steam Early Access is scheduled for September 7, 2026. The store copy is the launch target: 26 run-modifying player cores, 14 Hazard Cores (40 cores total), 5 playable machines, 7 traps, 8 utility cards, and 7 physics-effect cards, on top of 20 towers and 150+ upgrades. The public demo collection snapshot showed Towers 20/20, Traps 4/4, Cores 28/28, and Machines 4/4. Use the store counts as the launch target. Use the demo as a smaller snapshot of the same systems.
This wiki does not invent proper names for cores or machines that have not been published. Shop core icons exist in the UI. They are unnamed here on purpose. We describe roles from store and UI copy: starting tools, real-time abilities, run modifiers, and campaign Hazard difficulty. For cube modules, stay on upgrades and tech trees. For the roguelite spine, stay on the campaign walkthrough. For sample hands, stay on the builds hub.
Player cores versus Hazard Cores
Player cores are the 26 run-modifying cores you choose for your operator. They rewrite a rule for the rest of the run: extra Energy, different Matter math, a physics tweak, a starting-tool change. You feel a player core in the first wave. If the core fights your cubes, the run is already arguing with itself. Pick a player core that reinforces a job you already like: hold, shove, lighten, or cash.
Hazard Cores are the 14 campaign taxes. They are difficulty modifiers on regions, not toys you first-pick for fun. A Hazard Core asks the lab to survive a nastier physics rule. Agree to that tax only when your machine already has a spare job. If your board is a lonely Fan, a Hazard Core is how you leak with extra steps.
Forty cores total is 26 plus 14. The demo’s 28/28 collection bar was a smaller snapshot on the same screen. When a guide says “unlock cores in meta-progression,” it means both rows fill across Campaign, not that you start a run with forty icons equipped.
Because shop icons are unnamed here, judge a core by the sentence it prints, not by the art. If the sentence changes Energy, it is a hand core. If it changes Matter, it is a shop core. If it changes mass, friction, temperature, or conductivity, it is a physics core. Physics cores want physics basics. Hand cores want how to play.
Five machines as run-defining loadouts
Early Access is targeting five playable machines. The demo collection showed four. Each machine defines a run style with unique starting items and a real-time ability. That is store copy, and it is enough to rank machines as loadouts without naming them.
A machine is not a sixth tower type. It is the chassis under the twenty cubes. Starting items decide your first-wave verbs. The real-time ability is the button you press during Start Attack when the physics needs a shove the board cannot give. Pick a machine the way you pick a first hand: you want at least two of hold, shove, lighten, and cash in the starting tools, plus an ability that covers the job you lack.
If a machine starts you with extra production tools, you still need a knockoff edge from the tower roster. If a machine starts you with extra offense, you still want a control cube in the first shop. Machines make opening bias. They do not replace tower synergies.
In Campaign, lock the machine before you lock the player core. The machine is the chassis. The player core is the paint. Hazard Cores are weather. Cubes are the engine you bolt on between stages. Standard TD, Endless, Puzzle, and Workshop can ignore some of that stack. Puzzle in particular cares about a clean machine plus a few cubes, not a forty-core museum.
Traps and utility
Traps are the extra board pieces that are not in the 20-tower list. Early Access is targeting seven. The demo showed four. Confirmed trap copy includes This Way: a sign with a 10% chance that an enemy follows it forever. That is a pathing trap, not a damage trap. Place it like a Deflector for walkers. A 10% forever-follow is a joke until it is a win. Do not build a whole lab on 10%. Do build a lab that is happy when 10% fires.
Utility cards are the eight-count row. Confirmed names are Aftershock, Arc Discharge, Gravity Dampener, Black Ice, Salvage, and Hot Swap. Two utility names in the EA eight are unpublished here. Playtest notes removed Salvage and Hot Swap from the Region 1 starting deck alongside Tesla, so treat those two as later-region tools, not openers.
Role guesses from the names, without fake numbers:
- Aftershock: a follow-up physics pulse after a knock, useful next to Bomb, Pulse, or Tesla.
- Arc Discharge: an electrical dump, useful next to Tesla and copper, wasted on rubber.
- Gravity Dampener: a well limiter, useful when Gravity over-captures or when you need a robot to leave orbit toward an edge.
- Black Ice: a floor that disagrees with walkers, useful next to Fan and Cryo.
- Salvage: a resource tool, useful next to Grinder and Matter shops, later-region after the starting-deck removal.
- Hot Swap: a replacement tool for cubes or modules, later-region after the same removal.
Physics-effect cards are a separate seven-count row. They are not towers, not traps, and not the eight utility cards. Treat them as one-shot physics verbs you play into the lab: extra gust, extra mass change, extra bounce. They fill a missing job for a wave. They do not replace a machine.
Planning a Campaign loadout
- Pick a machine whose starting tools already cover two jobs.
- Pick a player core that reinforces one of those jobs.
- Draft cubes from the tower roster to fill the empty jobs.
- Spend T using upgrades and tech trees on the cube that already has a partner.
- Add a Hazard Core only when the board has spare capacity.
- Treat This Way, Black Ice, and Gravity Dampener as pathing tools, not as a second offense row.
If you want a single comparison to the tower tier list: machines rank like S-tier cubes (they create jobs), player cores rank like A-tier cubes (they amplify a job), Hazard Cores rank like a tax, traps rank like Deflector (plumbing), and utility ranks like a one-wave module. That analogy breaks if you first-pick Salvage in Region 1. Do not.
Unlock order across meta-progression will fill the collection bars you saw in the demo. The EA bars will be taller: more cores, more machines, more traps. The roadmap is the place for those counts over time. This page is the place for how the rows interact on day one of Early Access.
Lock the chassis, then the paint, then the weather. A machine with two starting jobs, a player core that agrees, and no Hazard Core until Region 2 will leak less than a rare unnamed core on a chassis you do not understand. After that, go back to the builds hub for hands, and to the campaign walkthrough for the three-region spine.
Frequently Asked Questions
Quick answers for new Tower Lab players.
How many cores are in Tower Lab Early Access?
The launch target is 26 player cores plus 14 Hazard Cores, 40 total. The demo collection showed 28/28. Confirm counts on the Early Access page.
What is the difference between player cores and Hazard Cores?
Player cores rewrite your run. Hazard Cores are campaign difficulty modifiers. Loadout order is on this cores and machines page.
How many machines are there?
Five at the Early Access target, each with unique starting items and a real-time ability. The demo showed 4/4. They are run chassis, not extra tower names.
What does the This Way trap do?
This Way has a 10% chance that an enemy follows the sign forever. It is pathing, not damage. Place it like plumbing, next to ideas on tower synergies.
Which utility cards are confirmed?
Aftershock, Arc Discharge, Gravity Dampener, Black Ice, Salvage, and Hot Swap. Salvage and Hot Swap were removed from the Region 1 starting deck. Module rules sit on upgrades and tech trees.
Do you list every core name?
No. Shop icons exist, but unpublished proper names are not invented here. Plan Campaign from roles, then follow the campaign walkthrough and the builds hub.