
Tower Lab How to Play
The wave loop: draw a hand, spend energy, build versus attack, simulate, then shop.
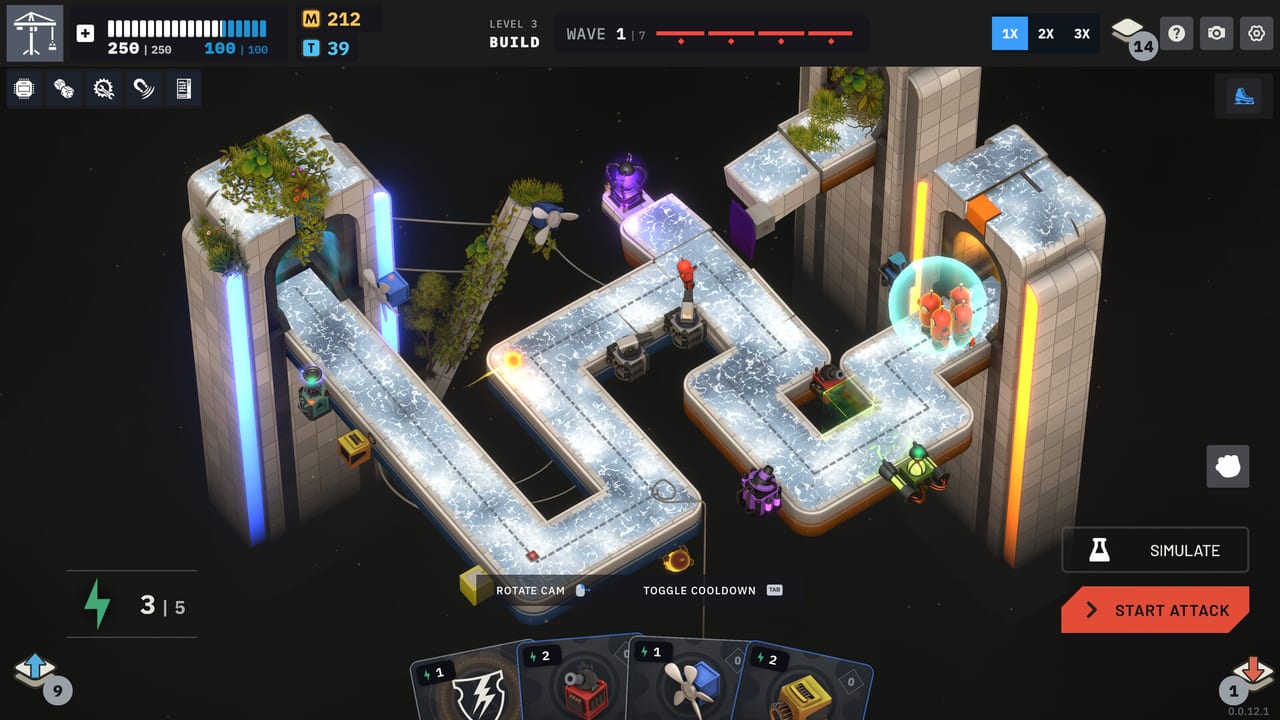
Tower Lab plays like a card game strapped to a physics sandbox. You do not hold a wave with raw fire rate. You draw a hand, spend energy, commit a layout, then let gravity, wind, and knockback do the violence. This page is the loop. If you have not installed the client yet, start with the first-hour getting started walkthrough. Camera prompts and Steam options are listed on the keyboard and mouse controls list.
Steam Early Access is scheduled for September 7, 2026. The rules below describe that launch loop, not a hypothetical 1.0 rewrite.
The deck, the hand, and energy
You begin a run with a small deck. Each wave you draw a hand. Energy (lightning) is the spend resource for cards in that hand. If a card costs more than you have, it stays unplayed. Hand and energy refresh when the next wave starts, so a skipped card is not gone forever — it is a decision you declined for this layout.
That refresh is the whole skill. New players dump the hand because unused energy feels like waste. Strong players leave a bad card unplayed so the next wave can redraw into a Fan, Shrink, or production piece that actually matches the lab.
Utility cards named in patch notes include Aftershock, Arc Discharge, Gravity Dampener, Black Ice, Salvage, and Hot Swap. Physics-effect cards are a separate stack (seven on the Early Access store list). You do not need every name before you understand the loop: if it costs energy, it is a hand decision. Salvage and Hot Swap are not Region 1 openers anymore; a patch pulled them from that starting deck along with Tesla.
Build phase versus attack
The build phase is the only time you should rearrange the lab like a puzzle. Place towers in open space. Leave cliffs, air lanes, and conveyor room. Right-click a tower to sell it or open its tech tree if the last wave proved the piece is in the wrong job.
Start Attack is the commit button. After that, robots are live and the layout has to work. You can still change speed: 1X to read collisions, 2X for a normal pace, 3X when the line is clearly winning. Simulate lets you preview behavior without treating every click as a scored wave. Photo mode is for capturing a contraption, not for rewriting physics mid-panic.
Move Tower exists because placement is the build. Focus Cam (F) and Reset Cam (N) exist because a bad camera angle hides the cliff you thought you had. Toggle Cooldown (Tab) is there so you can see whether a tower is actually cycling or just looking busy. Steam’s Mouse Only Option, Save Anytime, and Camera Comfort are the comfort layer around that HUD.
What you are actually playing toward
Offense towers — Mine, Kinetic, Pulse, Tesla, Bomb, Harpoon, Rocket — apply force. Control towers — Deflector, Fan, Gravity, Bola, Cryo, Flame, Shrink, Grow, Merge, Split, Imploder — change direction, size, or grouping. Production towers — Grinder and Constructor — convert the wave into resources or extra pieces. The complete tower roster is the name list; this page only cares that you stop treating every card like a damage turret.
Tesla is the example that fools people coming from classic tower defense: it zaps with high knockback and prioritizes conductive materials. It is a knockoff tool, not a last-hit tool. Fan is directional wind. You point it to push toward a void or to slow a lane that is about to leak. Grinder eats robots into Scrap and wants a Conveyor Line off the output. If you place a Grinder with no line, you built a noisy bin.
The launch list also includes 7 traps and 5 machines. This Way is the trap to remember early: a passing enemy has a 10% chance to follow the sign forever. That is a routing joke with a real percent, not a 100% wall.
Vend-O-Lab services
Between stages the Vend-O-Lab is the only economy screen that matters. Buy a card if it extends a combo you already run. Reroll if the offer is noise. Remove a card if the deck is too thick to draw the pieces you need. Upgrade the tech tree with tech points (T). Take the next level when you are done shopping.
Matter (M) funds the shop. Tech points fund ranks. They are not the same pile. Spending Matter on a random card while your tech tree still has a cheap rank that would make Tesla or Fan actually throw mass is a common first-run leak. For what those ranks do, keep the upgrade and tech tree notes open while you shop. Do not buy every rank. Buy the rank that matches the physics you already placed.
Campaign locks most of that shopping between stages. Standard TD is the exception that lets you spend Matter anytime, even mid-wave, using a campaign-unlocked toolbox. Do not import that habit into Campaign and then wonder why the Vend-O-Lab feels strict.
Energy discipline wins more labs than a flashy late-game Tesla. If a card does not change mass, direction, or economy this wave, leave it in hand and let the refresh do its job.
Frequently Asked Questions
Quick answers for new Tower Lab players.
Does unused energy bank between waves?
No. Hand and energy refresh each wave. Unspent energy is a skipped option, not a savings account. Play a card only if it changes this layout.
What does Simulate actually do?
Simulate previews how the current lab behaves so you can read collisions before you fully commit attention to a live wave. Puzzle mode is built around that habit; Campaign still benefits from it on messy layouts.
When should I remove a card in the shop?
When the deck is too thick to draw the Fan, Grinder, or control piece you actually need. Removal is a skill, not an emergency button. Reroll first if the offer is junk; remove if the deck itself is the junk.
Can I spend Matter during a wave in Campaign?
Campaign shops between stages. Standard TD is the mode that lets you spend Matter anytime, including mid-wave, with a campaign-unlocked toolbox.
Why did my Tesla not finish the wave?
Tesla knocks; it does not apply health damage. Point it at conductive materials and give the body a cliff. If plastic bodies walk past, you have a targeting problem, not a missing damage stat.
How many towers are on the launch list?
Twenty, with 150+ upgrades. The complete tower roster splits them into Offense, Control, and Production.